LangGraph is a low-level orchestration framework from the LangChain team. We use it to build stateful, multi-agent applications. Unlike plain linear chains, LangGraph lets us define cyclical loops, conditional routing, and persistent state. This makes it ideal for complex, autonomous agents modeled as Finite State Machines (FSM).
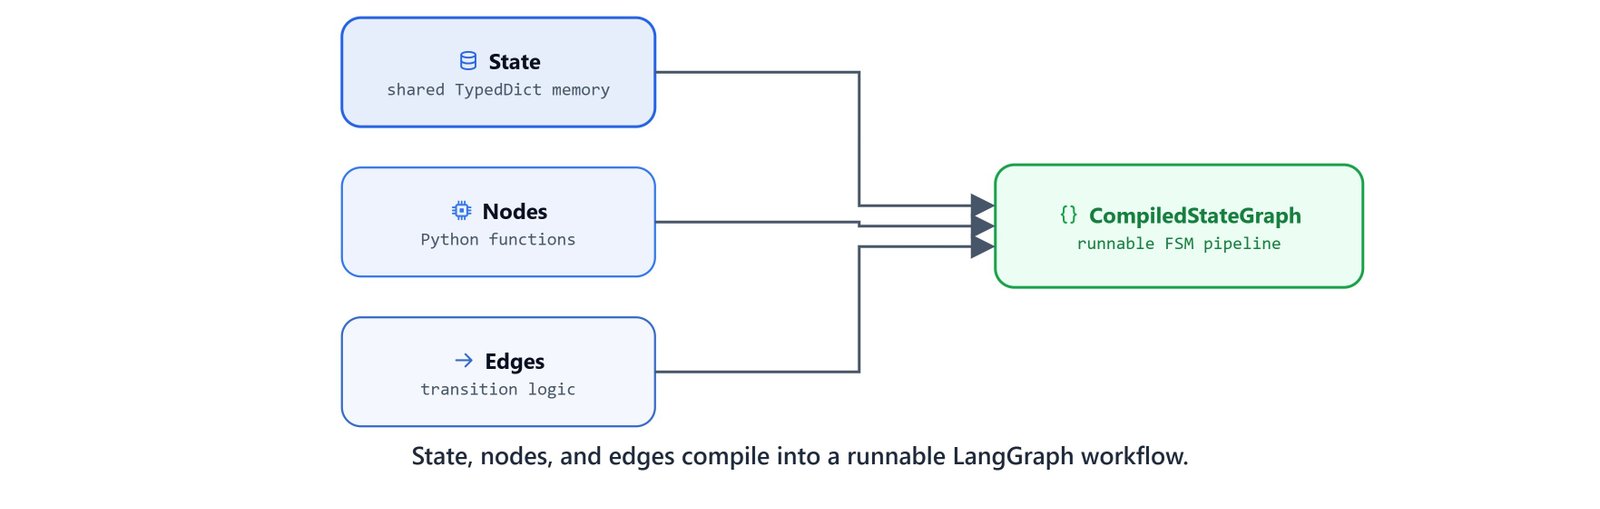
At the core of any LangGraph workflow are three concepts:
- State: the shared memory that every step in the graph reads and writes.
- Nodes: independent Python functions that do one job (such as processing input, querying an LLM, or calling a tool) and return updates to the State.
- Edges: connections that define the flow from one node to the next.
Before we dive into LangGraph, we should know the basics of LangChain. See the LangChain Getting Started guide as a prerequisite.
Defining Graph State
The State is the single source of truth for the whole workflow. We represent it as a Python dictionary schema, usually with TypedDict. This schema lists the keys and data types that nodes can read and modify.
Import the necessary utilities:
from typing_extensions import TypedDict
from langgraph.graph import StateGraph, START, END
Now, define a class SimpleState that contains input_text and output_text keys:
class SimpleState(TypedDict):
    input_text: str
    output_text: str
We can initialize and inspect this state schema like any standard dictionary:
SimpleState(input_text="hello", output_text="HELLO"){'input_text': 'hello', 'output_text': 'HELLO'}
Creating Custom Nodes
Nodes are standard Python functions that hold the logic of our application. Each node takes the current state as input. It returns a dictionary with only the keys it wants to update in the shared state.

Let's define the first node, process_input, which converts the input_text string to uppercase and writes it to output_text:
def process_input(state: SimpleState) -> SimpleState:
    output_text = state['input_text'].upper()
    return {'output_text': output_text}
We can test this node function in isolation by passing it a sample state dictionary:
state = {'input_text': 'hello', 'output_text': ''}
process_input(state){'output_text': 'HELLO'}Next, define a second node, add_prefix, which adds an introductory phrase to the output_text:
def add_prefix(state: SimpleState):
    print("Current State [Prefix]", state)
    output = "Hey, i have added something here. " + state['output_text']
    return {'output_text': output}
We can chain these function calls by hand to see the changes build up:
add_prefix(process_input(state))Current State [Prefix] {'output_text': 'HELLO'}
{'output_text': 'Hey, i have added something here. HELLO'}Finally, define the third node, add_suffix, which appends an ending phrase to output_text:
def add_suffix(state: SimpleState):
    print("Current State [Suffix]", state)
    output = state["output_text"] + ". i have added suffix!"
    return {'output_text': output}
Test all three nodes sequentially by nesting their calls:
add_suffix(add_prefix(process_input(state)))Current State [Prefix] {'output_text': 'HELLO'}
Current State [Suffix] {'output_text': 'Hey, i have added something here. HELLO'}
{'output_text': 'Hey, i have added something here. HELLO. i have added suffix!'}Composing the StateGraph
Instead of nesting function calls by hand, we can define a graph with StateGraph. This class takes our state schema (SimpleState) as an argument and compiles it into a runnable pipeline.

We define the compilation inside a helper function create_simple_graph():
- Initialize the
StateGraphbuilder with our state schema. - Add the custom node functions to the graph using
builder.add_node(name, function). - Create edges using
builder.add_edge(source, destination). The flow starts at theSTARTsentinel, moves through the nodes sequentially, and ends at theENDsentinel. - Compile the graph builder to create a LangChain-runnable object.
def create_simple_graph():
    builder = StateGraph(SimpleState)

    # Add the nodes
    builder.add_node("process_input", process_input)
    builder.add_node("add_prefix", add_prefix)
    builder.add_node("add_suffix", add_suffix)

    # Connect the edges
    builder.add_edge(START, "process_input")
    builder.add_edge("process_input", "add_prefix")
    builder.add_edge("add_prefix", "add_suffix")
    builder.add_edge("add_suffix", END)

    # Compile the graph builder
    graph = builder.compile()

    return graph
Instantiate the graph object:
graph = create_simple_graph()
graph<langgraph.graph.state.CompiledStateGraph object at 0x0000018D8F4EC680>Tip
In Jupyter environments, you can visually render the Compiled StateGraph using .get_graph().draw_mermaid_png() if you have PyGraphviz or other rendering dependencies installed.
Invoking the Graph
To run the workflow, pass an initial state dictionary with the required input_text key to the .invoke() method. LangGraph then manages the shared state and passes it along the edges to each node.
initial_state = {'input_text': "hello"}
graph.invoke(initial_state)Current State [Prefix] {'input_text': 'hello', 'output_text': 'HELLO'}
Current State [Suffix] {'input_text': 'hello', 'output_text': 'Hey, i have added something here. HELLO'}
{'input_text': 'hello',
'output_text': 'Hey, i have added something here. HELLO. i have added suffix!'}Here, we can see the state flow through all three nodes, from uppercase, to prefix, to suffix.
State Isolation and Persistence
LangGraph ignores keys that are not in the state schema. If we pass extra metadata (e.g., "some_other_state"), the graph runtime drops it. So it never pollutes the final output:
initial_state = {'input_text': "hello", "some_other_state": 'hi'}
graph.invoke(initial_state)Current State [Prefix] {'input_text': 'hello', 'output_text': 'HELLO'}
Current State [Suffix] {'input_text': 'hello', 'output_text': 'Hey, i have added something here. HELLO'}
{'input_text': 'hello',
'output_text': 'Hey, i have added something here. HELLO. i have added suffix!'}Also, even if we pre-fill a key that a node manages (like output_text), the node overwrites it when it runs:
initial_state = {'input_text': "hello", "output_text": 'hi'}
graph.invoke(initial_state)Current State [Prefix] {'input_text': 'hello', 'output_text': 'HELLO'}
Current State [Suffix] {'input_text': 'hello', 'output_text': 'Hey, i have added something here. HELLO'}
{'input_text': 'hello',
'output_text': 'Hey, i have added something here. HELLO. i have added suffix!'}This is how a LangGraph workflow works. We defined a shared State, wrote nodes that each update part of it, and wired them with edges. The compiled graph then runs the nodes in order and manages the state for us.