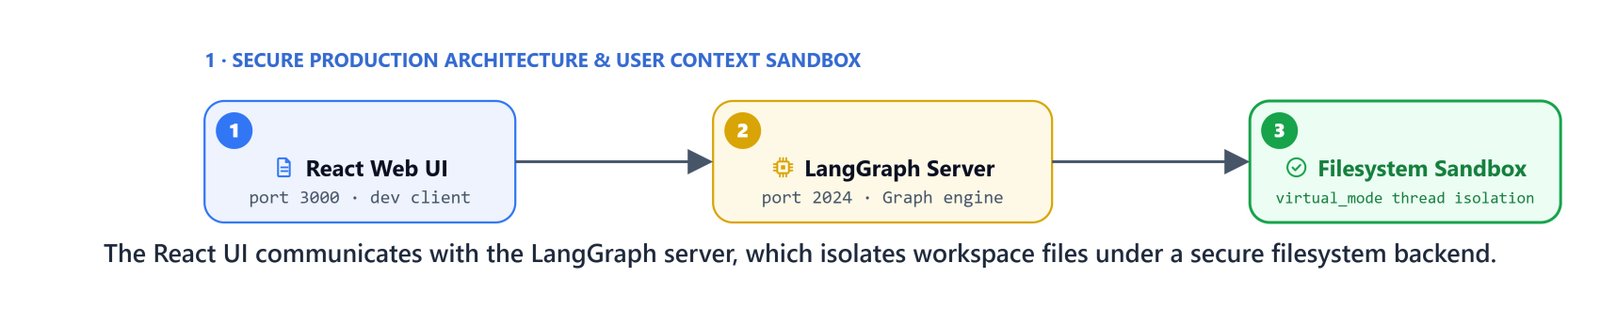
For enterprise setups, multi-agent systems must run inside secure environments. LangChain's DeepAgent framework gives us built-in delegation, context isolation, and a sandboxed file store. We combine this framework with the LangGraph CLI server and a web interface. Together they let us deploy a production research assistant.
In this blog, we configure the DeepAgent framework, set up secure file backends, and deploy the system.
Implementing the Sandboxed DeepAgent
The DeepAgent class organizes the logic by handing tasks to sandboxed child agents. Each child agent runs with its own prompt, its own tools, and its own context memory.
import os
import sqlite3
from datetime import datetime
from dotenv import load_dotenv
from langchain_google_genai import ChatGoogleGenerativeAI
from langgraph.checkpoint.sqlite import SqliteSaver
from deepagents import create_deep_agent
from deepagents.backends import FilesystemBackend
from scripts.rag_tools import hybrid_search, live_finance_researcher, think_tool
from scripts.deep_prompts import DEEP_RESEARCHER_INSTRUCTIONS, DEEP_ORCHESTRATOR_INSTRUCTIONS

load_dotenv()

# Select the model engine
model = ChatGoogleGenerativeAI(model='gemini-3-pro-preview')
Dynamic Sandboxed File Backends
To stop agents from reading or changing system files outside their workspace, we configure the FilesystemBackend with virtual_mode=True. This locks every file read and write inside one directory.
RESEARCH_OUTPUT_DIR = os.path.join(os.getcwd(), "research_outputs")

def get_research_backend(user_id: str, thread_id: str) -> FilesystemBackend:
    user_output_dir = os.path.join(RESEARCH_OUTPUT_DIR, user_id, thread_id)
    os.makedirs(user_output_dir, exist_ok=True)

    # Configure the filesystem backend sandbox
    backend = FilesystemBackend(
        root_dir=user_output_dir,
        virtual_mode=True  # Locks agent operations inside this folder path
    )
    return backend
Initializing the Orchestrator and Child Sub-Agents
Construct the research sub-agent and attach it to the parent orchestrator:
current_date = datetime.now().strftime("%Y-%m-%d")

# Define the child researcher sub-agent schema
research_sub_agent = {
    "name": "financial-research-agent",
    "description": "Delegate financial research tasks here. Query one target task at a time.",
    "system_prompt": DEEP_RESEARCHER_INSTRUCTIONS.format(date=current_date),
    "tools": [hybrid_search, live_finance_researcher, think_tool]
}

def get_deep_agent(user_id: str, thread_id: str):
    # Setup conversation checkpointer memory
    conn = sqlite3.connect('data/deep_agent_finance_researcher.db', check_same_thread=False)
    checkpointer = SqliteSaver(conn=conn)

    # Setup safe sandboxed directory
    backend = get_research_backend(user_id, thread_id)

    # Compile the final deep agent
    agent = create_deep_agent(
        model=model,
        tools=[hybrid_search, live_finance_researcher, think_tool],
        system_prompt=DEEP_ORCHESTRATOR_INSTRUCTIONS,
        subagents=[research_sub_agent],
        checkpointer=checkpointer,
        backend=backend
    )
    return agent
When queried, the orchestrator hands subtasks to the child agent. All output files, such as research_request.md and final_report.md, land straight in the user's own folder:
from scripts.agent_utils import stream_agent_response

agent = get_deep_agent(user_id="kgptalkie", thread_id="session_1")
stream_agent_response(agent, "What was Amazon's revenue in Q1 2024?", thread_id="session_1")Writing research files to: C:\Users\your-username\project\research_outputs\kgptalkie\session_1
[Tool Triggered]: write_todos
Arguments: {
'todos': [
{'status': 'in_progress', 'content': 'Save research request to /research_request.md'},
{'status': 'pending', 'content': "Research Amazon's Q1 2024 revenue using a sub-agent"},
{'status': 'pending', 'content': 'Synthesize findings and write final report to /final_report.md'}
]
}
[Tool Completed]Production Deployment Steps
To deploy this multi-agent team in production, we run the LangGraph executor as an API service and connect it to a web frontend.
Prerequisites and Software Requirements
Install the required runtimes and command-line tools:
- uv: fast Python package installer and manager.
- Node.js: version 24 LTS.
- nvm (or nvm-windows on Windows): Node version manager.
- Yarn: version 4 or newer.
- LangGraph CLI: version 0.4.11.
Minimum system requirements: 8GB RAM, 10GB disk space, and Python 3.11+.
Target Repositories
Clone the project repositories:
- Backend:
https://github.com/your-username/deep-finance-research - Frontend:
https://github.com/langchain-ai/deep-agents-ui
Step 1: Deploying the Backend API Server
Navigate to the cloned backend directory and start the LangGraph developer server:
cd deep-finance-research
langgraph devRunning LangGraph API server on http://localhost:2024This starts the graph server on port 2024 and opens the local LangGraph console.
Step 2: Running the Frontend UI Web App
Navigate to the frontend project directory, install dependencies, and start the development server:
cd deep-agents-ui
yarn install
yarn devReady on http://localhost:3000Open http://localhost:3000 in your web browser. In the settings panel, connect the UI to your running backend API at http://localhost:2024.
Setup Resources and Video Guides
For detailed setup walkthroughs across different environments, refer to these step-by-step playlists:
- Windows setup playlist: https://www.youtube.com/playlist?list=PLc2rvfiptPSQdX4jeLgW4nf5PId4j1msI
- macOS setup playlist: https://www.youtube.com/playlist?list=PLc2rvfiptPSQVDu8nzUHb7FEkNCdU-E0o
- AWS cloud setup playlist: https://www.youtube.com/playlist?list=PLc2rvfiptPSRHHDk76XvdfQ3ilX5EnfoV
Verifying the Deployment Environment
Let's verify that all the engines, package managers, and runtimes installed correctly:
uv --version
node --version
yarn --version
langgraph --helpuv 0.1.5
v24.0.0
4.0.2
Usage: langgraph [OPTIONS] COMMAND [ARGS]...This is how we take a DeepAgent research system to production. We sandboxed each agent's files with a virtual filesystem backend, served the graph with the LangGraph CLI, and wired it to a React frontend. The whole team now runs behind an API that real users can reach.