The Model Context Protocol (MCP) lets AI models talk to external tools, files, and APIs through one open standard. Before we build MCP servers and clients, we need a dependable local toolchain. That means a Python distribution, a local LLM runtime, a JavaScript runtime for the many npm-based MCP servers, the Claude Desktop host, and a fast package manager.
In this blog, we install Anaconda, Ollama, Node.js, Claude Desktop, and uv. We default to Windows commands and label the Linux and macOS equivalents clearly. At the end, we build a reproducible uv project that loads API keys from a .env file.

Note
If you have already configured Ollama and pulled local models, you can skim the Ollama section here and follow the deeper Ollama Setup Guide instead.
Installing Anaconda
Anaconda is a Python and R data-science distribution with built-in package and environment management. It gives us conda, a clean way to isolate the Python version this course uses (3.11+).
Download the installer for your operating system from the official Anaconda download page.
Tip
Search "Anaconda Distribution download" to reach the official page, or visit anaconda.com/download.
System requirements: Windows 10+ (64-bit), macOS 10.13+, or 64-bit Linux, each needing about 5 GB of free space.
Windows installation
- Run the downloaded
.exefile (right-click → Run as administrator if prompted). - Follow the installation wizard.
- When offered, check Add Anaconda to PATH so
condaworks from any terminal. - Complete the installation (10-15 minutes).
On macOS: open the downloaded .pkg file and follow the installer prompts.
On Linux: run the installer script and accept the license terms.
bash ~/Downloads/Anaconda3-2024.02-1-Linux-x86_64.shVerify and create an environment
conda --version
conda list
Create and activate a dedicated environment for this course:
conda create -n ml python=3.11
conda activate ml
Important
Keep this ml environment active in every terminal where we install course packages or run MCP servers. Mixing environments is the most common cause of "module not found" errors later.
Installing Ollama
Ollama runs large language models locally on our machine. So we can build private MCP agents without sending data to a cloud API. This course uses local models such as qwen3, gpt-oss, and the nomic-embed-text embedding model.
Windows installation
Download the installer from the official Ollama site and run the .exe. On Windows and macOS, Ollama runs as a background service automatically after install.
Tip
The official site is ollama.com, and the full model catalog is at ollama.com/library.
On macOS: download from ollama.com, or use Homebrew:
brew install ollamaOn Linux:
curl -fsSL https://ollama.com/install.sh | shPull and run models
ollama pull llama3.2:3b
ollama pull qwen3
ollama pull nomic-embed-text
Run a model interactively and list what you have installed:
ollama run llama3.2:3b
ollama list
Verify the local API is responding (Ollama serves on port 11434):
ollama --version
curl http://localhost:11434/api/generate -d "{\"model\": \"llama3.2:3b\", \"prompt\": \"Why is the sky blue?\"}"
On Linux/macOS: the same curl works with single quotes around the JSON body:
curl http://localhost:11434/api/generate -d '{"model": "llama3.2:3b", "prompt": "Why is the sky blue?"}'Note
Models need disk space and RAM, budget roughly 4 GB+ per model and 16 GB system RAM for comfortable use. A GPU is optional but speeds up generation significantly.
Installing Node.js
Many MCP servers ship as npm packages and run with npx (for example the filesystem, Playwright, and Airbnb servers used later in this course). Node.js provides that JavaScript runtime.
Tip
Install the LTS (Long Term Support) version for stability. The official site is nodejs.org.
Windows installation
Download the LTS installer from nodejs.org and run it, or use a Windows package manager:
winget install OpenJS.NodeJSOn macOS:
brew install nodeOn Linux (Ubuntu/Debian):
sudo apt update
sudo apt install nodejs npm
Verify
node --version
npm --version
node -e "console.log('Hello Node.js!')"Installing Claude Desktop
Claude Desktop is Anthropic's desktop app. It also doubles as an MCP host. That means it can connect to multiple MCP servers at once and call their tools directly inside a conversation. We use it heavily in the data-analysis and Claude Desktop sections of this course.
Download it from the official Claude download page.
Tip
The official download is at claude.ai/download.
Windows installation
- Download
Claude-Setup.exe. - Run the installer and follow the wizard.
- Launch Claude from the Start Menu, sign in with your Anthropic account, and accept the terms.
On macOS: open the downloaded .dmg, drag Claude into your Applications folder, and launch it.
Warning
Claude Desktop is officially available for Windows and macOS. If you are on Linux, you can still complete the LangChain/LangGraph and deployment sections, which do not depend on Claude Desktop.
uv vs pip: a faster package manager
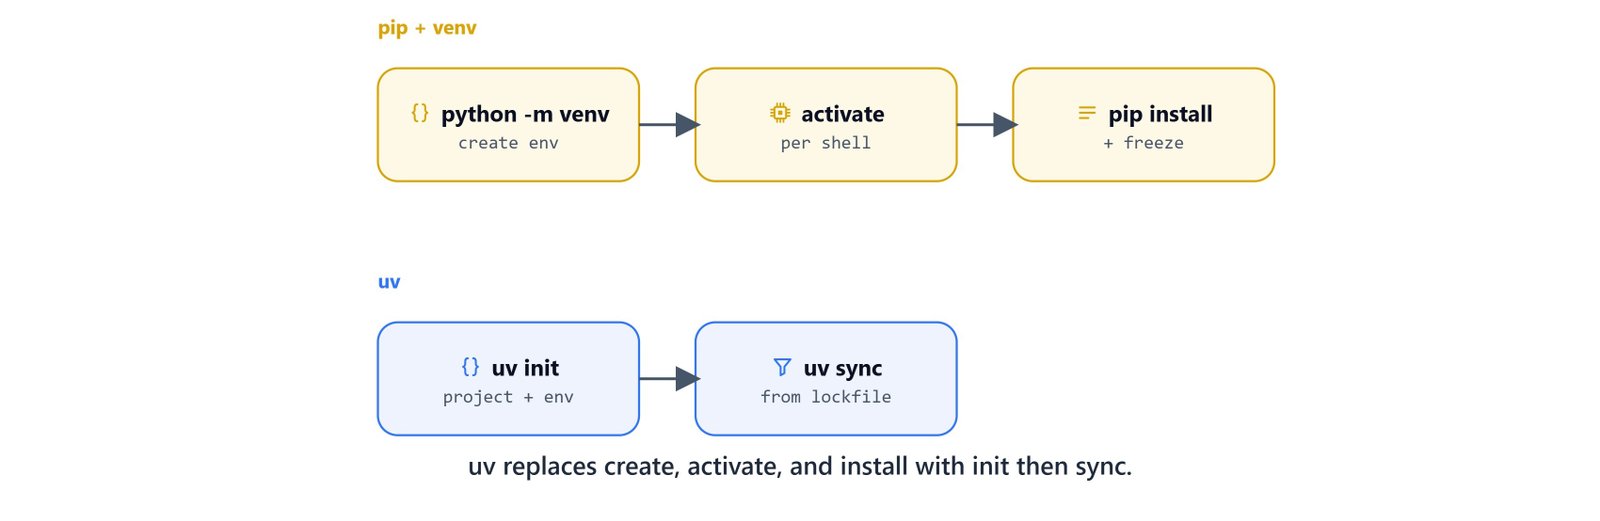
uv is a modern, very fast Python package installer and project manager written in Rust. It is a drop-in replacement for pip and pip-tools. It is the tool this course uses to manage dependencies.
Why uv over pip:
- 10-100× faster installs and dependency resolution.
- Built-in virtual environment management, with no separate
venvstep. - Lockfiles by default (
uv.lock) for reproducible builds. - Smarter dependency resolution for complex conflicts.
- Consistent behavior across Windows, macOS, and Linux.
Installing uv on Windows
powershell -c "irm https://astral.sh/uv/install.ps1 | iex"On Linux/macOS:
curl -LsSf https://astral.sh/uv/install.sh | shYou can also install it with pip into your active environment:
pip install uvTip
The official uv documentation is at docs.astral.sh/uv.
pip workflow vs uv workflow
The old pip workflow needs us to create and activate a virtual environment by hand:
python -m venv myenv
myenv\Scripts\activate
pip install requests numpy
pip freeze > requirements.txt
On Linux/macOS: activate with source myenv/bin/activate instead of myenv\Scripts\activate.
The uv workflow creates the project, environment, and lockfile for us:
uv init myproject
cd myproject
uv add requests numpy
uv sync
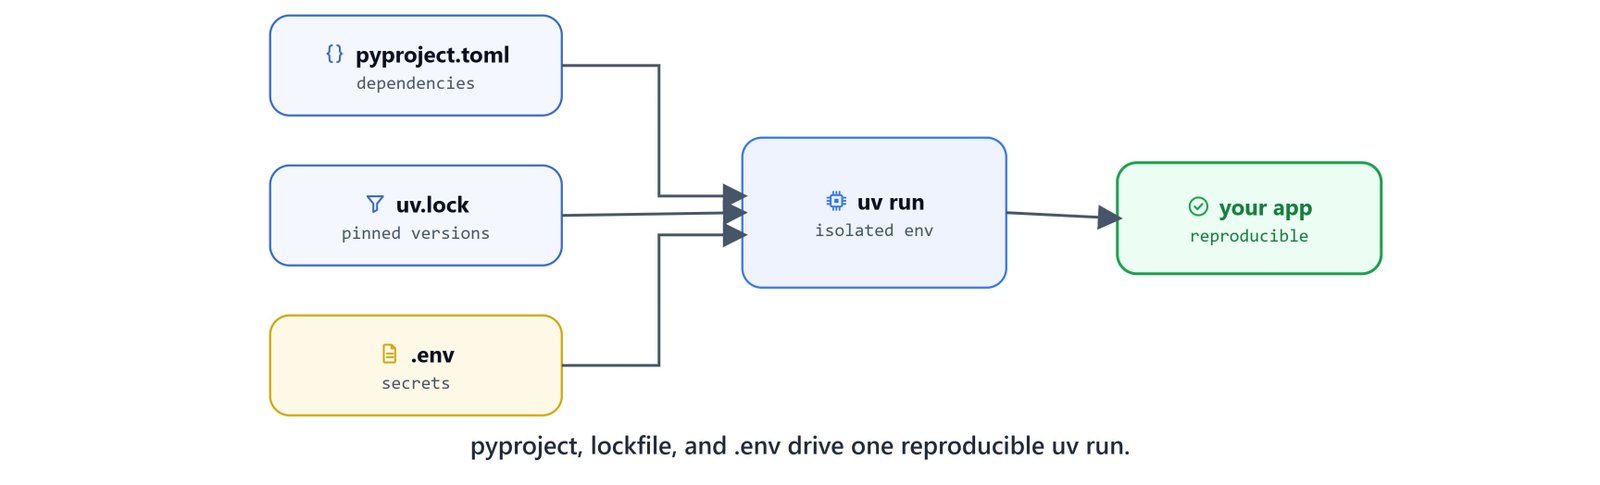
uv add records the dependency in pyproject.toml and updates uv.lock automatically. uv sync installs exactly what the lockfile pins.
Creating the course project with uv
Initialize a project for the course and add the libraries we need across every section:
uv init mcp-mastery-claude-and-langchain
cd mcp-mastery-claude-and-langchain
This scaffolds a project:
mcp-mastery-claude-and-langchain/
├── pyproject.toml    # Project configuration
├── uv.lock           # Lockfile (auto-generated)
├── main.py
└── README.md
Add the full dependency set used throughout the course:
uv add fastmcp "mcp[cli]" mcp-use langchain langchain-community langchain-ollama langchain-openai langchain-chroma langchain-mcp-adapters langgraph chromadb faiss-cpu streamlit fastapi pandas numpy scipy matplotlib pypdf2 requests python-dotenvNote
uv add pins minimum versions into pyproject.toml (for example fastmcp>=2.12.3, langchain>=0.3.27, langgraph>=0.6.7). Commit both pyproject.toml and uv.lock so collaborators reproduce your exact environment with a single uv sync.
Run a Python script inside the project environment without manually activating anything:
uv run python main.pyLoading API keys from a .env file
Some sections use cloud services (the Claude API, OpenAI embeddings for the deployed server, and optional LangSmith tracing). Store secrets in a .env file at the project root and load them with python-dotenv. Never hard-code keys in source.
Create a .env file:
OPENAI_API_KEY=your-openai-key-here
CLAUDE_API_KEY=your-anthropic-key-here
LANGSMITH_API_KEY=your-langsmith-key-here
Important
Add .env to your .gitignore so secrets are never committed. Replace each your-...-key-here value with your real key from the provider's dashboard.
A minimal main.py that loads and verifies the keys:
import os
from dotenv import load_dotenv
load_dotenv()

def main():
    print("OPENAI_API_KEY:", os.getenv("OPENAI_API_KEY"))
    print("CLAUDE_API_KEY:", os.getenv("CLAUDE_API_KEY"))
    print("LANGSMITH_API_KEY:", os.getenv("LANGSMITH_API_KEY"))
    print("Hello from mcp-mastery-claude-and-langchain!")

if __name__ == "__main__":
    main()
Run it:
uv run python main.pyOPENAI_API_KEY: your-openai-key-here
CLAUDE_API_KEY: your-anthropic-key-here
LANGSMITH_API_KEY: your-langsmith-key-here
Hello from mcp-mastery-claude-and-langchain!Tip
load_dotenv() reads .env from the current working directory by default. If we run scripts from a subfolder, pass an explicit path, e.g. load_dotenv("../.env").
Setup checklist
We now have the full toolchain installed and verified:
- Anaconda:
conda --versionworks; anmlenvironment is active. - Ollama:
ollama listshowsqwen3/nomic-embed-text; the API answers on port11434. - Node.js:
node --versionandnpm --versionprint versions. - Claude Desktop: installed and signed in (Windows/macOS).
- uv: a project with
pyproject.toml+uv.lockrunsuv run python main.py.
With the environment ready, we can move on. Next, we will understand what MCP actually is and how its client, host, and server pieces fit together in Introduction to Model Context Protocol.