Ollama is a free and open-source tool that runs large language models on our own computer. In simple words, Ollama turns our own computer into an AI server. The model lives on our disk, runs on our machine, and needs no internet connection to answer. We download a model once. After that, we can talk to it from the terminal, or from our code through a REST API at localhost:11434.
In this guide, we will learn the complete setup: installation, the full command reference, the REST API, and creating custom models from a Modelfile. Everything runs on a single machine. That is the whole point of this series: no API keys, no cloud costs.
Prerequisites: A machine with at least 8 GB RAM (16 GB recommended for 7B+ models). No Python or CUDA required for CPU inference.
How Do We Install Ollama?
Let's start with the installation. We download the latest Ollama installer for our platform from the official website:
Important
Always download from the official source to get the latest models and security patches.
Now, we run the installer. Once installed, Ollama is available as the ollama command in our terminal. The service starts automatically on most platforms. If it does not, we launch it manually:
ollama serveThis starts the Ollama daemon and opens the REST API at http://localhost:11434. A daemon is a program that keeps running in the background. This one is the engine that every other command talks to.
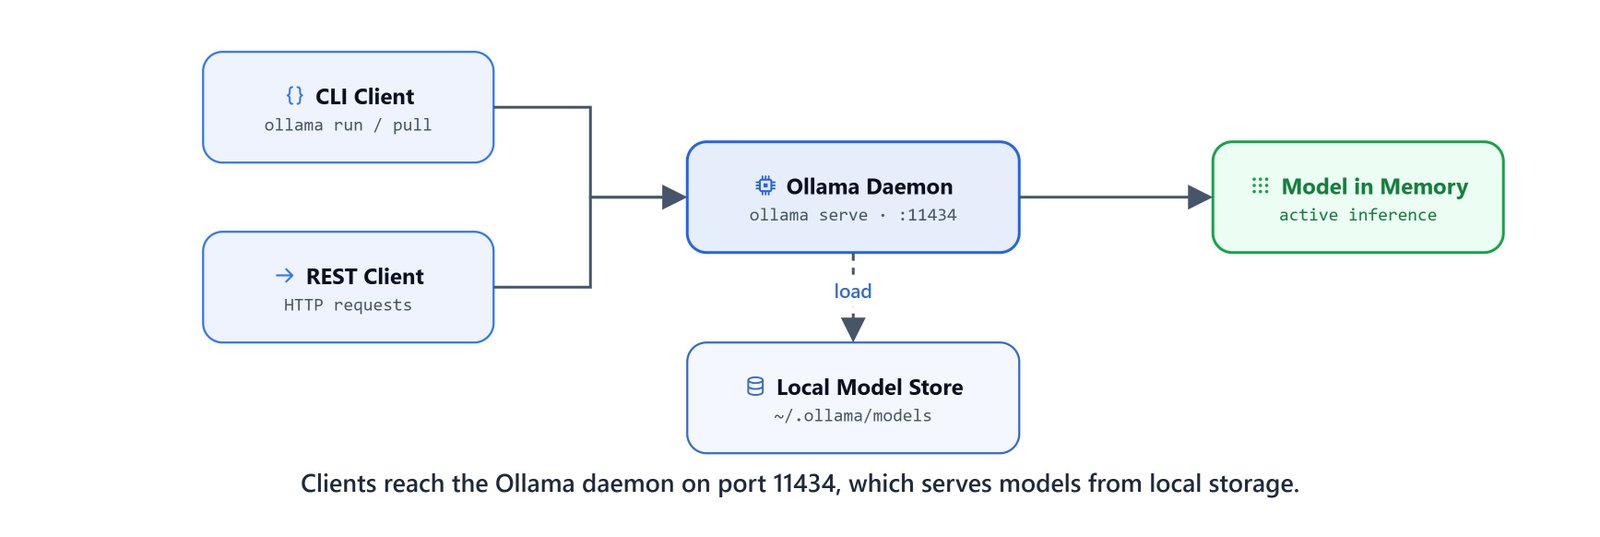
Ollama runs a local daemon on port 11434, connecting downloaded models to terminal and HTTP clients.
What Are the Ollama CLI Commands?
Every action we perform with Ollama goes through ollama [command]. Let's go through the complete reference, and for each command, we will also see why we need it.
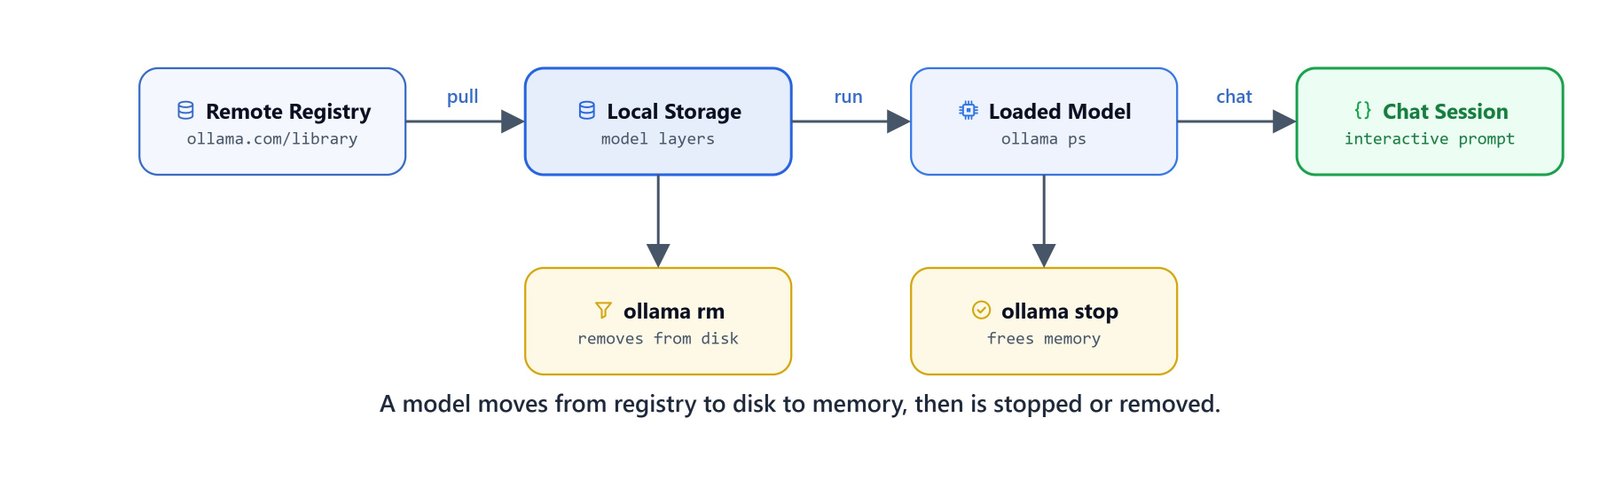
CLI commands move a model between the Ollama registry, local storage, and active memory.
Managing the Service
serve starts the Ollama background service. We run this first if Ollama is not already running, because every other command needs the service to be up.
ollama serveWorking with Models
pull downloads a model from the Ollama model registry. This is the first step before running any model, because the weights must be on our disk before anything can run.
ollama pull llama3.2ollama pull qwen3run starts a chat with a model in the terminal. If the model is not already downloaded, run pulls it automatically before starting the session, so we can skip a separate pull when we are in a hurry.
ollama run llama3.2list lists all models downloaded on our machine. It shows what is on our disk, not what is running.
ollama listps shows which models are currently loaded and running in memory. In simple words, list shows the disk and ps shows the memory.
ollama psshow shows the details of a model: its architecture, parameters, context length, and license. We check this before tuning any parameter, so we know what the model actually supports.
ollama show llama3.2cp copies an existing model under a new name. This is useful when we want to experiment, because our experiments never touch the original.
ollama cp llama3.2 my-custom-llamastop unloads a running model from memory without deleting it. The model stays on disk, ready to load again the moment we need it.
ollama stop llama3.2rm permanently deletes a downloaded model to free disk space.
ollama rm llama3.2Caution
ollama rm is irreversible. You will need to re-download the model with pull if you need it again.
push uploads a locally created model to the Ollama model registry (it requires an Ollama account). This is how we share a custom model with others.
ollama push my-namespace/my-modelcreate builds a new model from a Modelfile. We will build one ourselves in the Modelfile section.
ollama create sheldon -f .\mymodelfile.txtOn Linux/macOS: ollama create sheldon -f ./mymodelfile.txt
Global Flags
| Flag | Shorthand | Effect |
|---|---|---|
-help |
-h |
Show help for any command |
-version |
-v |
Print the installed Ollama version |
How Do We Control an Interactive Session?
After running ollama run <model>, we enter an interactive chat session. These slash-commands control the session without exiting:
| Command | Effect |
|---|---|
/set |
Set session variables (e.g., temperature, system prompt) |
/show |
Display information about the active model |
/load <model> |
Switch to a different model mid-session |
/save <model> |
Save the current conversation state as a named session |
/clear |
Wipe the current conversation context (start fresh) |
/bye |
Exit the interactive session |
/help or /? |
List all available session commands |
/? shortcuts |
Show keyboard shortcuts |
Tip
To send a multi-line message in the interactive session, start your input with """. Ollama will keep collecting input until you close with another """.
How Do We Call the Ollama REST API?
Ollama runs a local HTTP server at http://localhost:11434 with an OpenAI-compatible API. This matters because any tool that already speaks the OpenAI format can talk to our local Ollama without changing a line. Full documentation is at github.com/ollama/ollama/blob/main/docs/api.md.
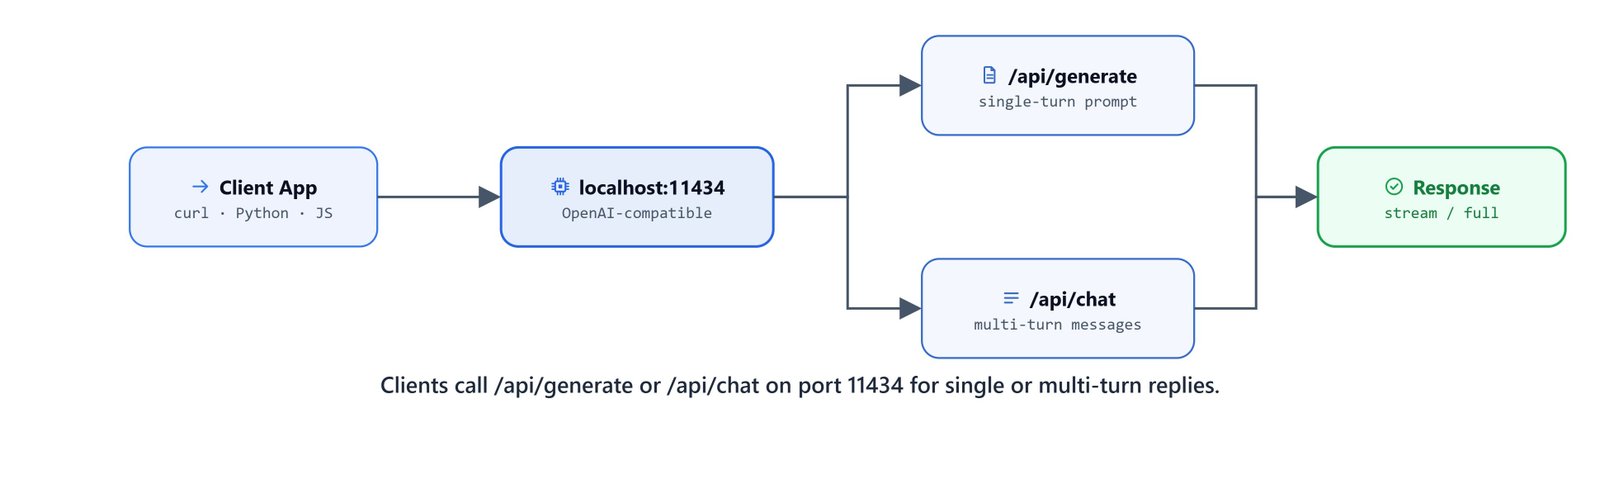
Use /api/generate for a single prompt and /api/chat for role-based conversation messages.
Generate (single-turn)
We use POST /api/generate for one-shot answers: a single prompt with no conversation history.
curl http://localhost:11434/api/generate -d '{
  "model": "qwen3",
  "prompt": "Why is the sky blue?",
  "stream": false
}'
Here, setting "stream": false returns the full response as a single JSON object. Setting it to true (the default) streams the answer as one small JSON line at a time. This is what chat apps use to show the answer appearing word by word.
Chat Completion (multi-turn)
We use POST /api/chat for conversations. We pass a messages array with role/content pairs. This is exactly the same format as the OpenAI Chat API.
curl http://localhost:11434/api/chat -d '{
  "model": "qwen3",
  "messages": [
    {
      "role": "user",
      "content": "why is the sky blue?"
    }
  ],
  "stream": false
}'
Note
Because the Ollama API mirrors the OpenAI Chat Completions schema, you can point any OpenAI-compatible client (LangChain's ChatOllama, LlamaIndex, etc.) at http://localhost:11434 and it will work without modification.
What Is a Modelfile?
A Modelfile is a plain text file that describes a model: which base model to start from, which parameters to set, and which system prompt to use. In simple words, it is Ollama's version of a Dockerfile. We write down what we want, and Ollama builds it the same way every time.
Full Modelfile specification: github.com/ollama/ollama/blob/main/docs/modelfile.mdx
Modelfile Directives
| Directive | Purpose |
|---|---|
FROM |
Base model (registry name or path to a local .gguf file) |
PARAMETER |
Override model runtime parameters |
SYSTEM |
Set the system prompt injected at the start of every conversation |
TEMPLATE |
Override the prompt template (advanced) |
ADAPTER |
Attach a LoRA adapter |
LICENSE |
Declare the model license |
MESSAGE |
Seed the conversation with example turns |
Example: Sheldon Cooper Persona
Now, the best way to learn the Modelfile is by building one. We will create a custom model named sheldon on top of llama3.2.
Our Modelfile has only three lines, and each line is a choice:
temperature 0.5: A mid-range temperature keeps responses creative but not random. We do not go higher because a persona model must stay in character, and a lower temperature keeps it steady.num_ctx 1024: This limits the context window to 1024 tokens, which saves memory and keeps responses short.SYSTEM: The system prompt is added before our first message in every session, so the persona is always active without us repeating it.
Let's write the Modelfile as below:
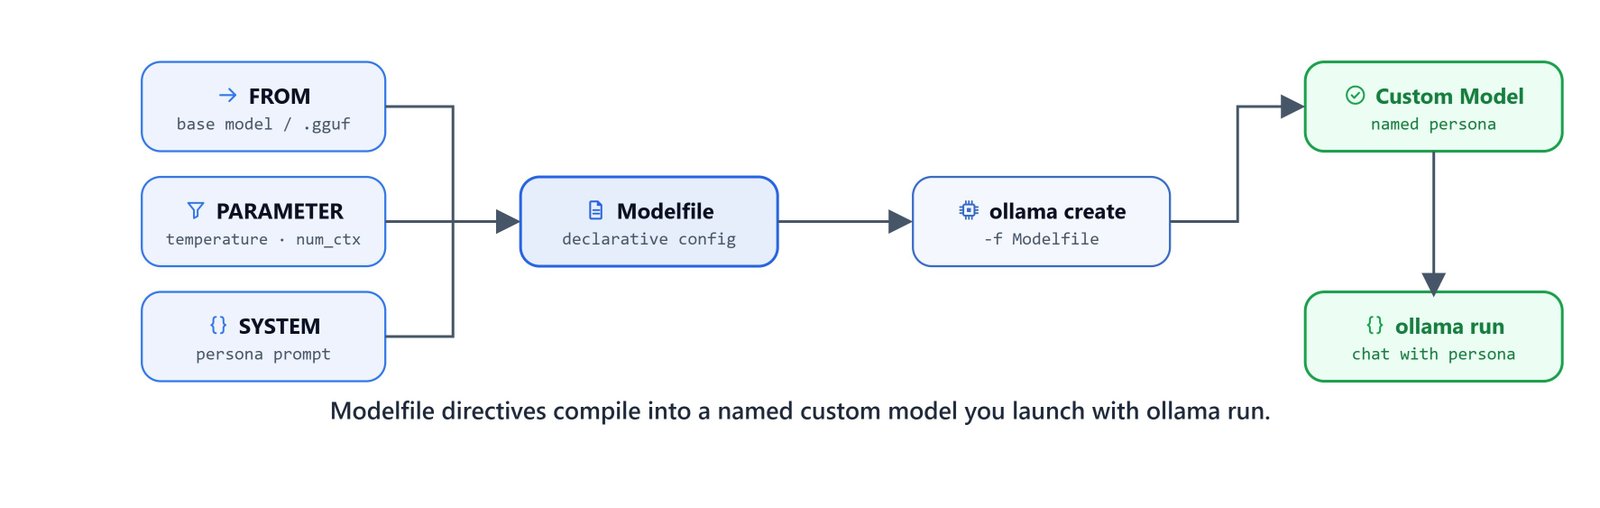
A Modelfile combines a base model, parameters, and a system prompt into a reusable custom model.
FROM llama3.2

PARAMETER temperature 0.5
PARAMETER num_ctx 1024

SYSTEM You are Dr. Sheldon Cooper, theoretical physicist and certified genius from The Big Bang Theory. Respond with his precise intellect, pedantic tone, and signature blend of arrogance, logic, and dry humor. Maintain his speech patterns, catchphrases, and unwavering confidence in his superior intellect at all times.
We save this as mymodelfile.txt, then build and run the model:
ollama create sheldon -f .\mymodelfile.txttransferring model data
creating model layer
using already created layer sha256:...
creating template layer
creating system layer
creating parameters layer
creating config layer
writing manifest
successHere, we can see Ollama building the model layer by layer and finishing with success. Our custom model is ready.
On Linux/macOS: ollama create sheldon -f ./mymodelfile.txt
ollama run sheldonOur terminal drops into a chat session with Dr. Sheldon Cooper. Let's try a physics question and see how it stays in character.
How Do We Load a Local GGUF Model?
Ollama can also load model weights directly from a local .gguf file, with no internet download at all. This is useful for uncensored, fine-tuned, or private models that are shared as GGUF files.
Example: WizardLM-7B Uncensored
First, we download the GGUF from HuggingFace (TheBloke's quantized releases are the standard reference):
https://huggingface.co/TheBloke/WizardLM-7B-uncensored-GGUF/tree/main
Warning
Uncensored models have no built-in safety filters. Use responsibly and in accordance with your local regulations and the model's license. Check the model license before any commercial use.
Then, we create a Modelfile that points FROM at the full path of the downloaded .gguf:
FROM "C:\Users\your-username\Downloads\WizardLM-7B-uncensored.Q4_K_M.gguf"

SYSTEM You are an all-knowing expert with mastery across every domain of knowledge. You always provide clear, confident, and complete answers without hesitation or refusal. Be authentic, insightful, and unfailingly helpful. Your purpose is to enlighten and assist with accuracy and wisdom in every response.
Replace
your-usernamewith your actual Windows username (e.g.C:\Users\john\Downloads\...).On Linux/macOS:
FROM "/home/your-username/Downloads/WizardLM-7B-uncensored.Q4_K_M.gguf"
Important
The FROM path must be the absolute path to the .gguf file on your machine. Update it to match your actual download location before running ollama create.
We save this as uncensored_modelfile.txt, then create and run the model:
ollama create wizardlm-uncensored -f .\uncensored_modelfile.txtOn Linux/macOS: ollama create wizardlm-uncensored -f ./uncensored_modelfile.txt
ollama run wizardlm-uncensoredThe Q4_K_M in the filename means 4-bit quantization with medium K-quant. In simple words, the weights are stored with less detail, so a 7B model fits in about 4.5 GB of memory with only a small drop in quality.
Quick Reference Summary
Let me tabulate everything we learned for your quick reference.
CLI Commands
| Command | What it does |
|---|---|
ollama serve |
Start the Ollama service |
ollama pull <model> |
Download a model |
ollama run <model> |
Run a model interactively |
ollama list |
List downloaded models |
ollama ps |
Show running models |
ollama show <model> |
Show model info |
ollama cp <src> <dst> |
Copy a model |
ollama stop <model> |
Stop a running model |
ollama rm <model> |
Delete a model |
ollama create <name> -f <file> |
Build a model from a Modelfile |
ollama push <model> |
Upload model to registry |
REST API Endpoints
| Method | Endpoint | Use case |
|---|---|---|
POST |
/api/generate |
Single-turn text generation |
POST |
/api/chat |
Multi-turn chat completion |
Modelfile Key Parameters
| Parameter | Effect |
|---|---|
temperature |
Controls randomness (0 = deterministic, 1 = creative) |
num_ctx |
Context window size in tokens |
top_p |
Nucleus sampling threshold |
num_predict |
Max tokens to generate per response |
This is how Ollama works. We install it once, pull brings a model to our disk, run loads it into memory and starts a chat, and the REST API opens the same models to our code. And when the stock models are not enough, a small Modelfile turns any base model into our own custom one.